There are several methods for transferring an image to our painting support (paper, card, canvas board, stretched canvas, plywood etc.,), These methods include (a) simply drawing the image Freehand, (b) using an Overhead Projector, (c) using a Grid, (d) using a Lightbox, (e) tracing paper, and (f) using mirrors.
Drawing freehand without any aid [an example amongst my work would be the sunken boat drawing]. This detailed pencil drawing, was drawn freehand on A4 sketching paper. My strongest advice for drawing freehand, is for you to try to draw what is actually there and not what you think is there. It is so easy to make assumptions rather than constantly checking the detail. It is also prudent not to make the marks too heavy until you are certain that those marks are in the correct location.
If we have the equipment then we can print the originating image onto laser or inkjet acetate, and then use an overhead projector to project that image onto our support [my example would be oil on canvas of a Rangerover set in a snow scene]. We could also project an originating image direct from the source (laptop, PC etc) using a projector. In both methods you simply draw in the detail, where it is projected onto the support. You would think that this is the perfect method, but alas there are several problems: the image can create a keystone effect (wider at the top than the bottom and other angles out) when projected onto the support and you have to be aware of this possibility and adjust accordingly, and the detail can be lost as the resolution may not be as good as that shown on a small screen.
Although drawing a grid on the originating image and on the support and then trying remove the grid lines, can be slow and laborious, this method for transferring an image to our support does have some distinct advantages. As long as the number of grid squares on the originating image and that area of the support where we are transferring the image are equal, then the grid dimensions can be varied and this allows us to accurately rescale (both increase or decrease) the originating material. Some of the grid squares can be further marked out to provide a grid within a grid for increased accuracy. [my example would be the Galleon in the mist that was created using watercolour pencils]. For an iPad you can upload the 'Split the Photo' App free of charge. This particular App allows the user to vary the number of grid lines and to change the grid colour.
Using a lightbox is also an old method. Although a modern equivalent would be to darken the room, and place the paper support over a laptop, PC, or an iPad, all with the screen brightness increased. The originating image will show through the paper and you just lightly pencil in the detail. Although care needs to be taken with an iPad as the originating image can resize when pencil movement is mistakenly interpreted as screen pinch [my example for this method would be some of my pen and ink and watercolour studies of antique fountain pens]. Providing the glass table is sturdy, you can place paper over a photograph on the table and use a lamp underneath. But always leave the lampshade on, and keep the electrics out of reach of babies and small children as light bulbs can become ridiculously hot. Remember to put it all away when you finish. You could of course buy a purpose made lightbox as that will remove risk and provide a sturdy platform.
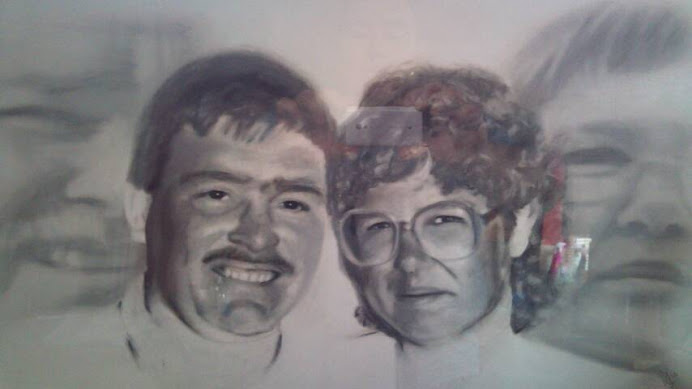
Using tracing paper has some limitations; it can be a slow process, there can be a loss of detail and just like the lightbox method, the originating image and the final image will be the same size. The tracing process is slow because you need to trace the originating image twice! You trace the originating image, and then reverse the tracing paper and redraw the same lines and shapes on the other side (to avoid the image being flipped). You then place the second drawing onto the support and lightly use a pencil on the top of the tracing paper to get the pencil underneath to transfer across [my example of this is an ongoing pastel study of one of my grandchildren].
I don't have an example for the mirrors, but will refer you to the self portraits of the Old Masters. Recent research suggests that by using two distinct types of mirror, which are positioned at the correct angles; it is possible for the artist to project their image onto the support for completion of the self portrait. Pretty sneaky really; because if they were using mirrors, then there must be an inference that they could use this mirror technique for far more than just self portraits.